ATF 可信启动调研
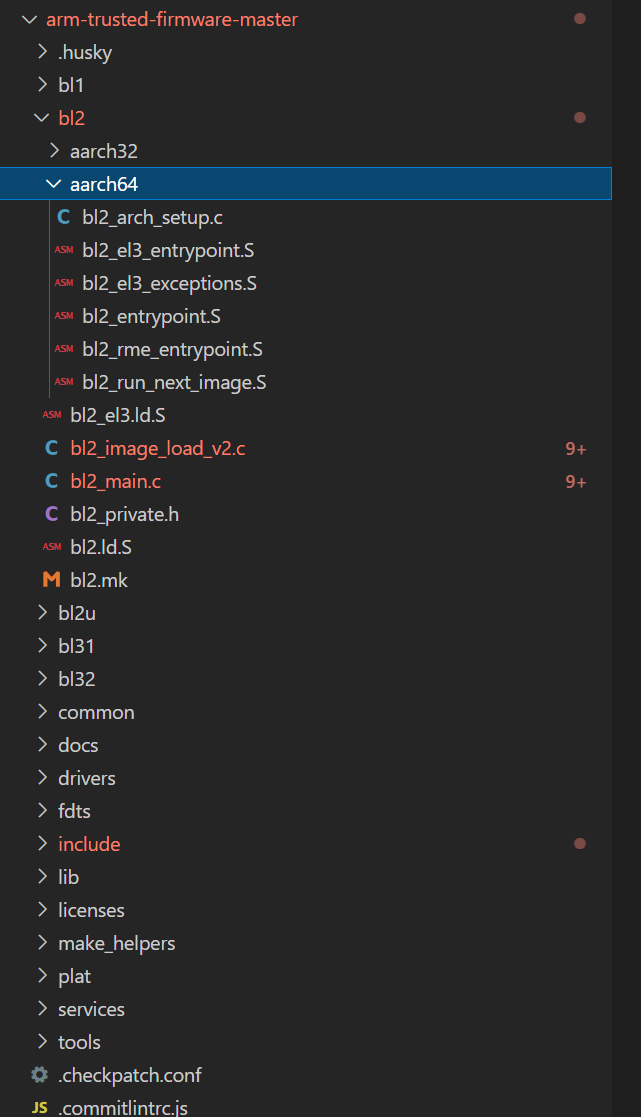
# ARM 安全技术(ATF 的可信启动)# 一、目标本文主要针对 ATF 的可信启动进行分析,可信机制主要位于代码的 BL2 文件夹中,目录结构如下:
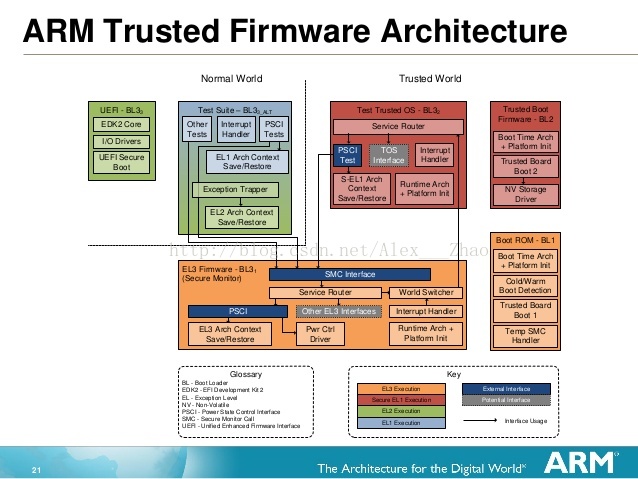
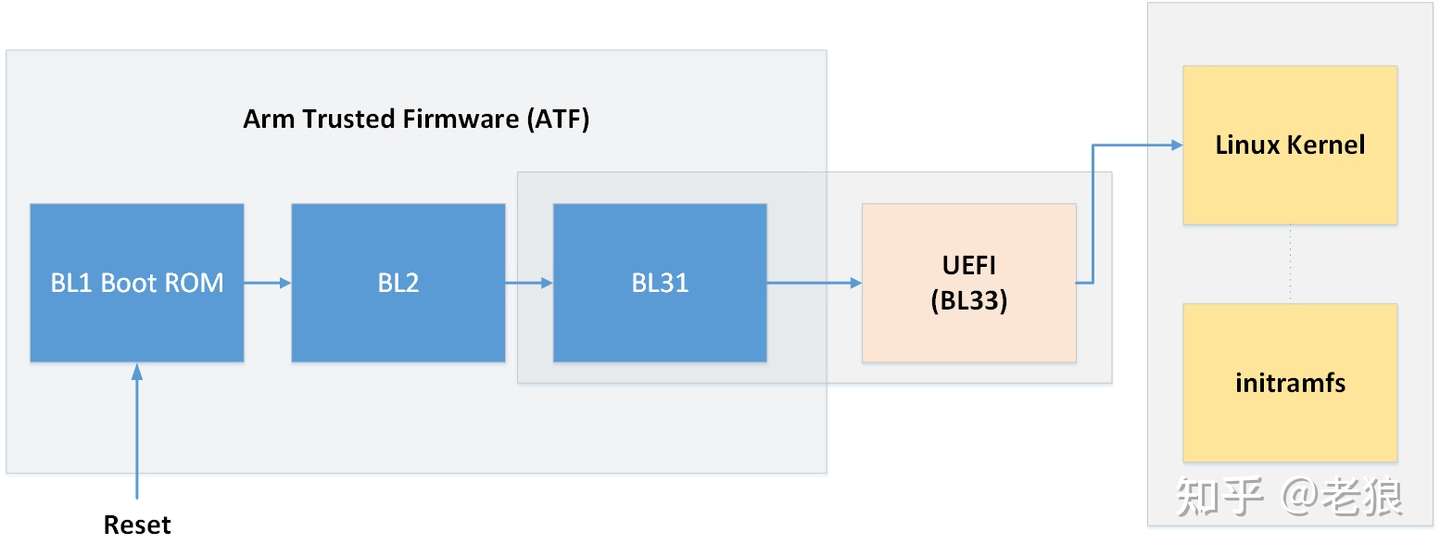
为便于后续分析给出 ATF 加载流程,给出官网中一个直观的流程图:
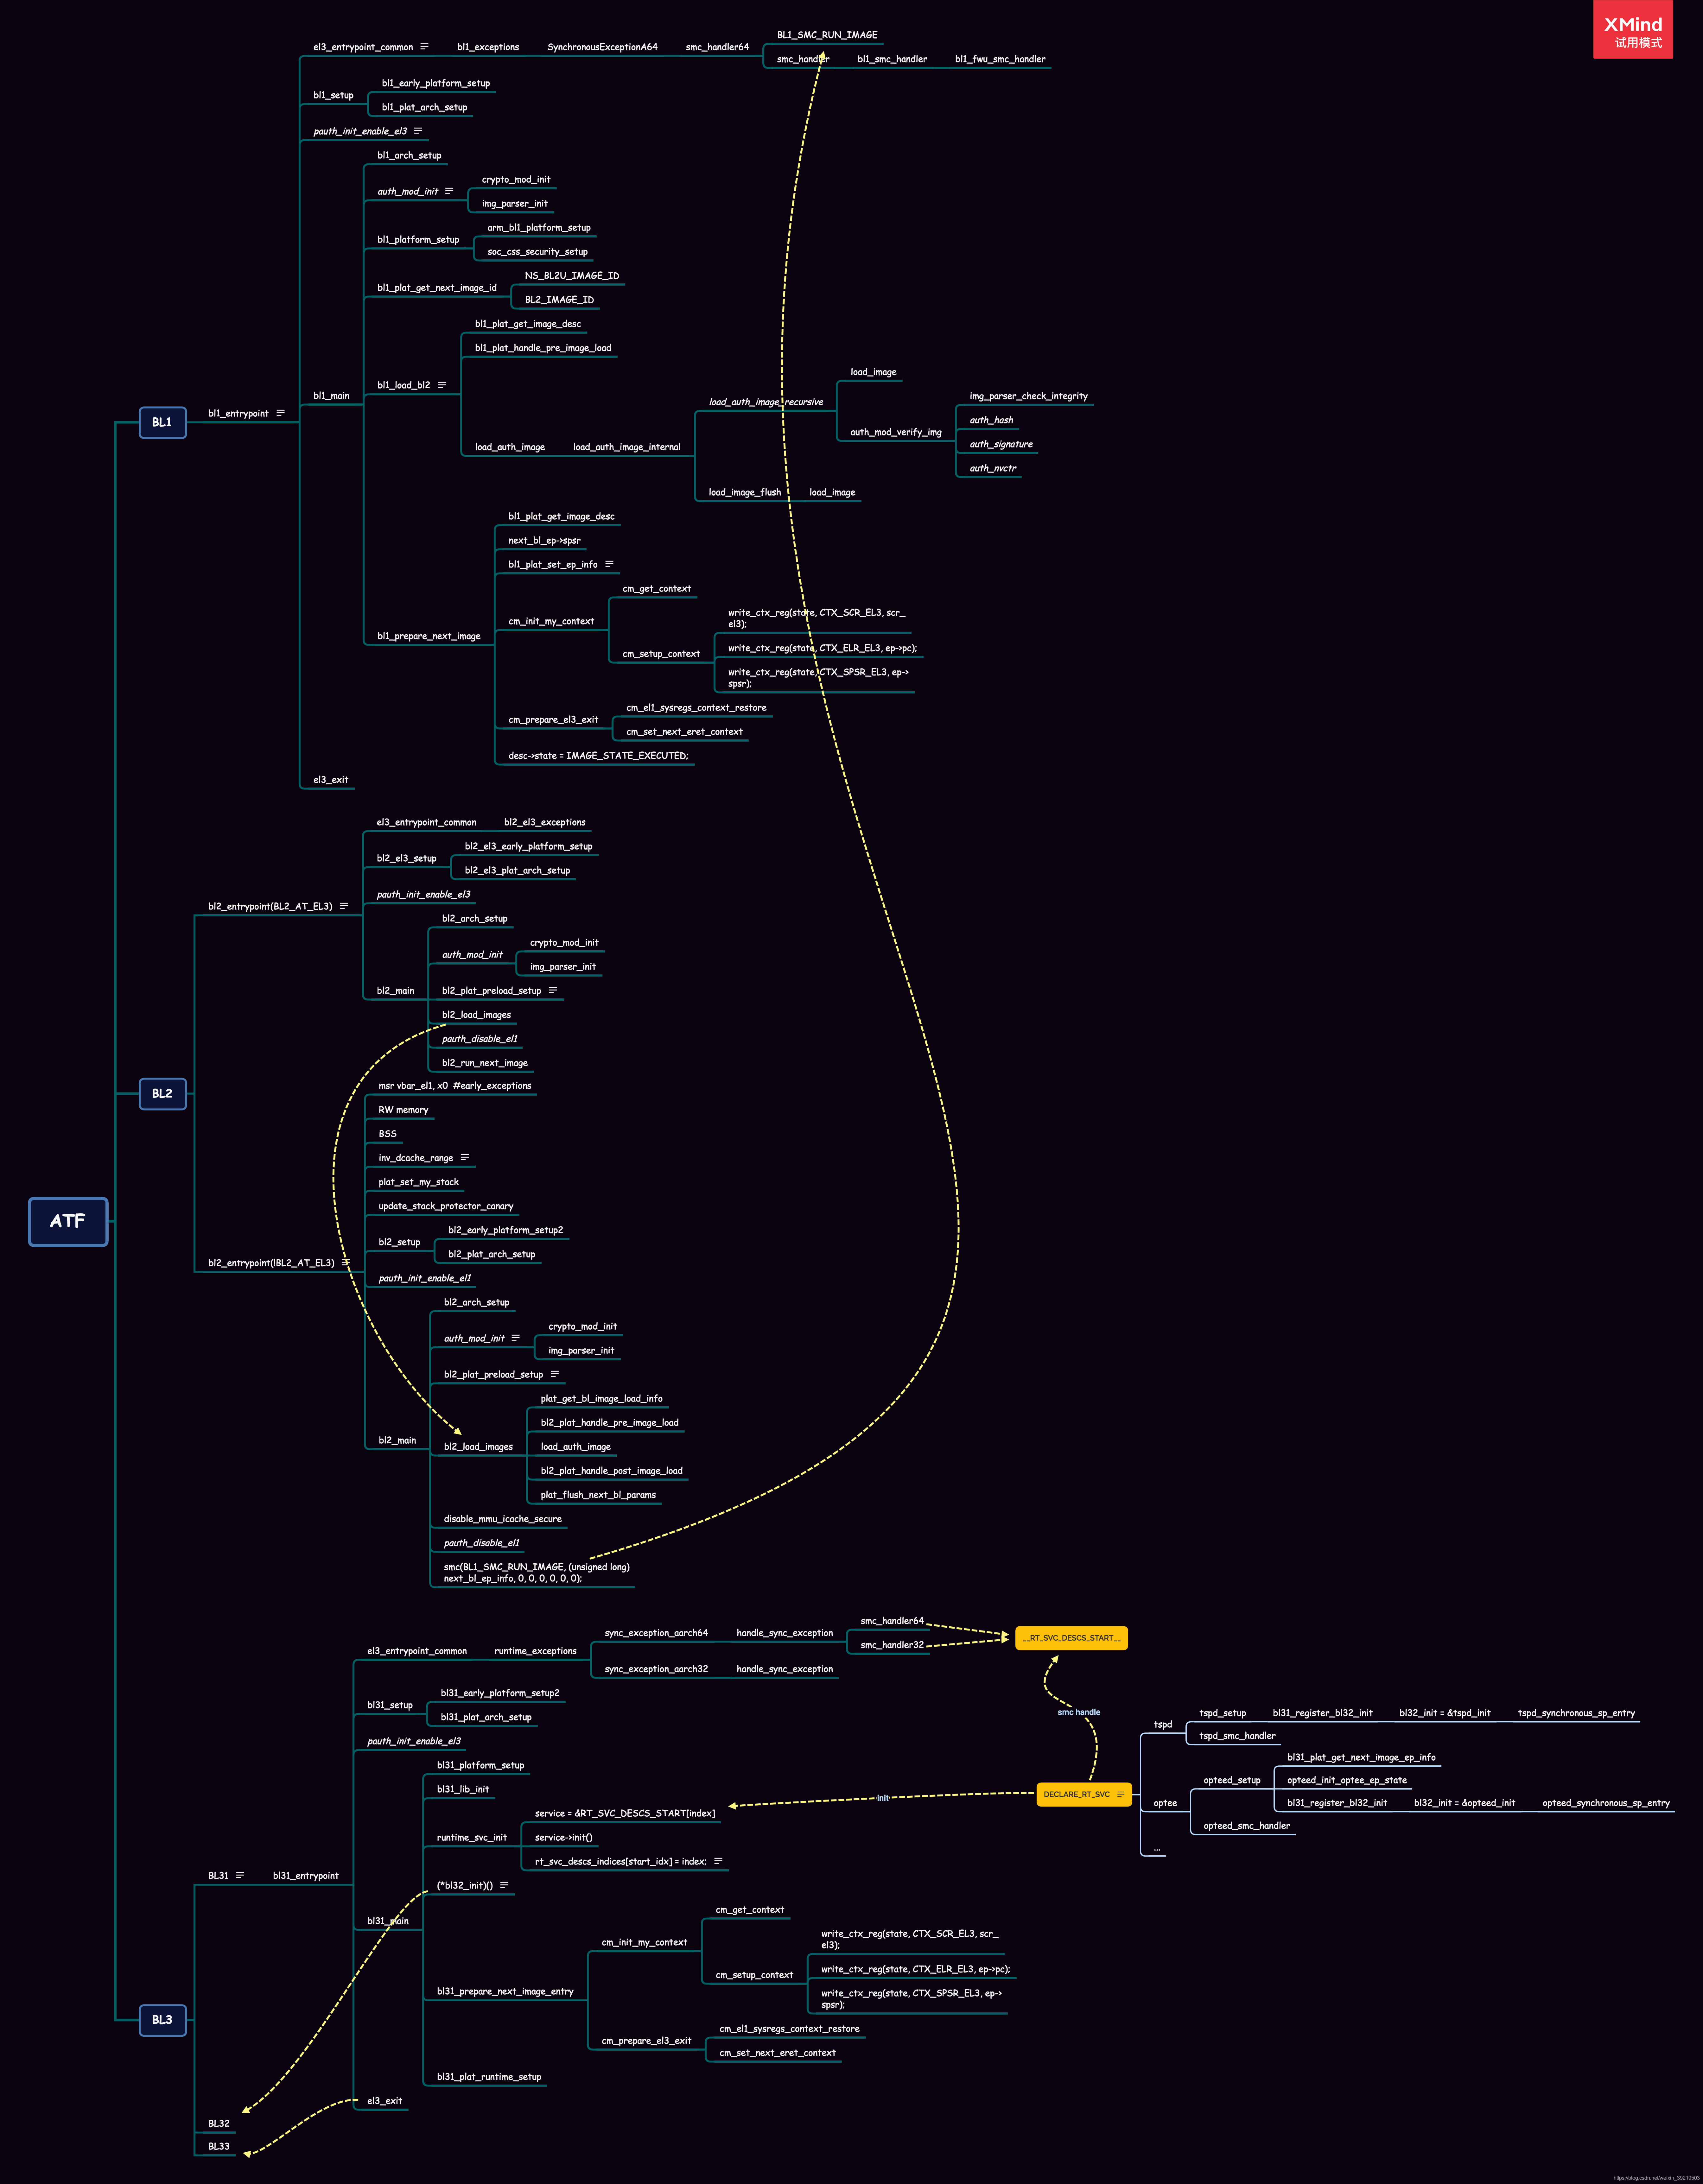
另外 ATF 固件源码整体架构如下:
# 二、核心服务原理分析# (一)安全启动与信任链安全启动是建立系统信任链(Chain of Trust)的基础。信任链(Chain of Trust)是基于根信任(Root of trust)创建的, 而根信任的实现是基于两种技术:不可修改的 bootloader 和不可被修改的公钥。公钥通常存放在 OTP(One-Time-Programmable)内存中, bootloader 同常存储在 ROM 中或者不可修改的 Flash 内存中。
# (二)安全启动流程图
为了便于后续对代码的理解分析,这里先给出安全启动流程图
# 说明:# arch 初始化对于 AArch64:
BL2 执行 normal world 和后续阶段所需的最小架构初始化。
通过清零 CPACR.FPEN 位,使 EL1 和 EL0 可以访问 SIMD 寄存器。
BL2 主要执行如下初始化步骤:
1、初始化 console (PL101).(尽管在 bl1 时已经初始化过一次)
# image loadBL2 通过查找 image list 的方式加载 image,并且将这个 list 传递给下一个 BL 镜像。
平台实现方法提供的可加载 image list 还可以包含动态配置文件。这个配置文件可以根据需要在 bl2_plat_handle_post_image_load()函数中进行解析。 通过更新此函数中的相应 ep 信息,可以将这些配置文件作为参数传递给下一个 Boot Loader 阶段。
# SCP_BL2 image loadBL2 将可选的 SCP_BL2 镜像从平台存储设备加载到特定的安全内存区域。 SCP_BL2 的后续处理是特定于具体平台的,需要自行实现。 例如,Arm Juno ,BL2 先把 SCP_BL2 加载到 trust sram,再使用 Boot Over MHU (BOM) 协议,把 SCP_BL2 加载到 SCP 的内部 RAM 之后,SCP 运行 SCP_BL2,并给 AP 发出 signals,通知 BL2 继续执行。
# Load EL3 softwareBL2 从平台存储设备加载 EL3 runtime software 到 trusted SRAM. 如果内存空间不够或者镜像不存在去,则 assert 停止运行。
# AArch64(Secure-EL1 payload) image loadBL2 将可选的 BL32 镜像从平台存储设备加载到特定于平台的安全存储区域。BL32 镜像在安全世界中执行。BL2 依靠 BL31 将控制权限传递给 BL32(如果存在)。 因此,BL2 也会使用 BL32 镜像的 entrypoint。 用于进入 BL32 的 Saved Processor Status Register(SPSR)的值不是由 BL2 确定的,它由 BL31 内的 Secure-EL1 Payload Dispatcher (SPD) 初始化,SPD 负责管理与 BL32 的交互。此信息将传递给 BL31。
# BL33(Non-trusted Fireware) image loadBL2 将 BL33 镜像(e.g. UEFI or other test or boot software)从平台存储设备加载到由平台定义的非安全内存中。
一旦安全状态初始化完成,BL2 依靠 EL3 Runtime Software 将控制权传递给 BL33。 因此,BL2 使用正常世界的镜像入口和保存程序状态寄存器(SPSR)填充平台指定的存储区域。entrypoint 是 BL33 镜像的加载地址。 SPSR 按照 PSCI PDD 中的规定确定(PSCI 5.13 节)。 此信息将传递给 EL3runtime software。
# AArch64 BL31(EL3 Runtime Software) executionBL2 执行继续如下:
BL2 通过产生 SMC 异常将控制权传递回 BL1,并给 BL1 提供 BL31 入口点。 SMC 异常由 BL1 阶段 install 的 SMC exception handler 来处理。
# 三、源代码分析# (一)BL1(Trusted Boot ROM )分析BL1 启动最早的 ROM,是在 CPU 的 ROM 里不是和 BIOS 一起,是一起的信任根。BL1 主要目的是建立 Trusted SRAM、exception vector、初始化串口 console 等等。然后找到并验证 BL2(验签 CSF 头),然后跳过去。
入口点:bl1_entrypoint.S:
1
2
3
4
5
6
7
8
9
func bl1_entrypoint .... bl bl1_early_platform_setup bl bl1_plat_arch_setup .... bl bl1_main .... b el3_exit endfunc bl1_entrypoint
# (二)BL2(Trusted Boot Firmware )分析# 1、功能概要BL2 主要负责对其他所有 BL 进行认证和加载,并执行 BL31, 该函数主要实现将 BL3x 的 image 加载 RAM 中,并通过 smc 调用执行 BL1 中指定的 smc handle 将 CPU 的全向交给 BL31。
# 2、主过程
各部分代码分析已在注释中给出
# BL2_entrypoint.S
BL2 入口位于 bl2/aarch64/bl2_entrypoint.S 中,BL2_entrypoint 是 BL2 的入口,前半部分主要进行一系列初始化工作,然后通过 BL2_main () 加载 BL3x 镜像到 RAM 中,最后通过 SMC 调用执行 BL1 中指定的 smc handler 将 CPU 执行权交给 BL31。
1
2
3
4
5
6
7
8
9
10
11
12
13
14
15
16
17
18
19
20
21
22
23
24
25
26
27
28
29
30
31
32
33
34
35
36
37
38
39
40
41
42
43
44
45
46
47
48
49
50
51
52
53
54
55
56
57
58
59
60
61
62
63
64
65
66
67
68
69
70
71
72
73
74
75
76
77
78
.globl bl2_entrypoint func bl2_entrypoint mov x20, x1 /* x1保存了内存布局信息 */ /* 设置异常处理函数 */ adr x0, early_exceptions msr vbar_el1, x0 isb /* --------------------------------------------- * 使能异常 * --------------------------------------------- */ msr daifclr, #DAIF_ABT_BIT /* --------------------------------------------- * 使能指令缓存,使能堆栈数据访问对齐检查 * --------------------------------------------- */ mov x1, #(SCTLR_I_BIT | SCTLR_A_BIT | SCTLR_SA_BIT) mrs x0, sctlr_el1 orr x0, x0, x1 msr sctlr_el1, x0 isb /* --------------------------------------------- * 失效内存 * --------------------------------------------- */ adr x0, __RW_START__ adr x1, __RW_END__ sub x1, x1, x0 bl inv_dcache_range /* --------------------------------------------- * BSS内存初始化 * --------------------------------------------- */ ldr x0, =__BSS_START__ ldr x1, =__BSS_SIZE__ bl zeromem16 #if USE_COHERENT_MEM ldr x0, =__COHERENT_RAM_START__ ldr x1, =__COHERENT_RAM_UNALIGNED_SIZE__ bl zeromem16 #endif /* -------------------------------------------- * 设置SP指针 * -------------------------------------------- */ bl plat_set_my_stack /* --------------------------------------------- * 串口初始化,更新内存布局信息,并初始化页表使能mmu * --------------------------------------------- */ mov x0, x20 bl bl2_early_platform_setup bl bl2_plat_arch_setup /* --------------------------------------------- * 跳转到主函数(通过SMC执行下一级BL不会返回) * --------------------------------------------- */ bl bl2_main /* --------------------------------------------- * 下面的代码不会执行 * --------------------------------------------- */ no_ret plat_panic_handler endfunc bl2_entrypoint
# BL2_mainbl2_main 为 bl2 的主程序,位于 bl2/bl2_main.c 中,安全启动的最重要两步在这个函数中完成:初始化硬件和找到 BL31。
1
2
3
4
5
6
7
8
9
10
11
12
13
14
15
16
17
18
19
20
21
22
23
24
25
26
27
28
29
30
31
32
33
34
35
36
37
38
39
40
41
42
43
44
45
46
47
48
49
50
51
52
53
54
55
56
57
58
59
60
61
62
63
64
65
66
67
68
69
70
71
void bl2_main(void) { entry_point_info_t *next_bl_ep_info; /* 输出提示信息 */ NOTICE("BL2: %s\n", version_string); NOTICE("BL2: %s\n", build_message); /* Perform remaining generic architectural setup in S-EL1 */ /* 初始化,这里开启FP/SIMD的访问权限 */ bl2_arch_setup(); #if PSA_FWU_SUPPORT fwu_init(); #endif /* PSA_FWU_SUPPORT */ crypto_mod_init(); //初始化加密库,加密库可以用于校验签名和哈希 /* Initialize authentication module */ auth_mod_init(); //初始化认证模块 /* Initialize the Measured Boot backend */ bl2_plat_mboot_init(); //初始化 measured boot后端 /* Initialize boot source */ bl2_plat_preload_setup(); //初始化镜像解析模块(img_parser_mod),用于校验镜像完整性以及从镜像中提取内容 /*加载后续引导加载程序映像。*/ next_bl_ep_info = bl2_load_images(); /*拆除 Measured Boot 后端*/ bl2_plat_mboot_finish(); #if !BL2_AT_EL3 && !ENABLE_RME #ifndef __aarch64__ /* * 对于 AArch32 状态,BL1 和 BL2 共享 MMU 设置。 * 鉴于 BL2 不映射 BL1 区域,MMU 需要 * 被禁用以返回 BL1。 */ disable_mmu_icache_secure(); #endif /* !__aarch64__ */ console_flush(); //控制台刷新 #if ENABLE_PAUTH /* * 在运行下一个引导映像之前禁用指针身份验证 */ pauth_disable_el1(); #endif /* ENABLE_PAUTH */ /* 调用smc指令,触发在bl1中设定的smc异常中断处理函数,跳转到bl31 */ smc(BL1_SMC_RUN_IMAGE, (unsigned long)next_bl_ep_info, 0, 0, 0, 0, 0, 0); #else /* if BL2_AT_EL3 || ENABLE_RME */ NOTICE("BL2: Booting " NEXT_IMAGE "\n"); print_entry_point_info(next_bl_ep_info); console_flush(); #if ENABLE_PAUTH /* * 在运行下一个引导映像之前禁用指针身份验证 */ pauth_disable_el3(); #endif /* ENABLE_PAUTH */ bl2_run_next_image(next_bl_ep_info); #endif /* BL2_AT_EL3 && ENABLE_RME */ }
下面依次对 bl2_main 中的安全模块进行分析:
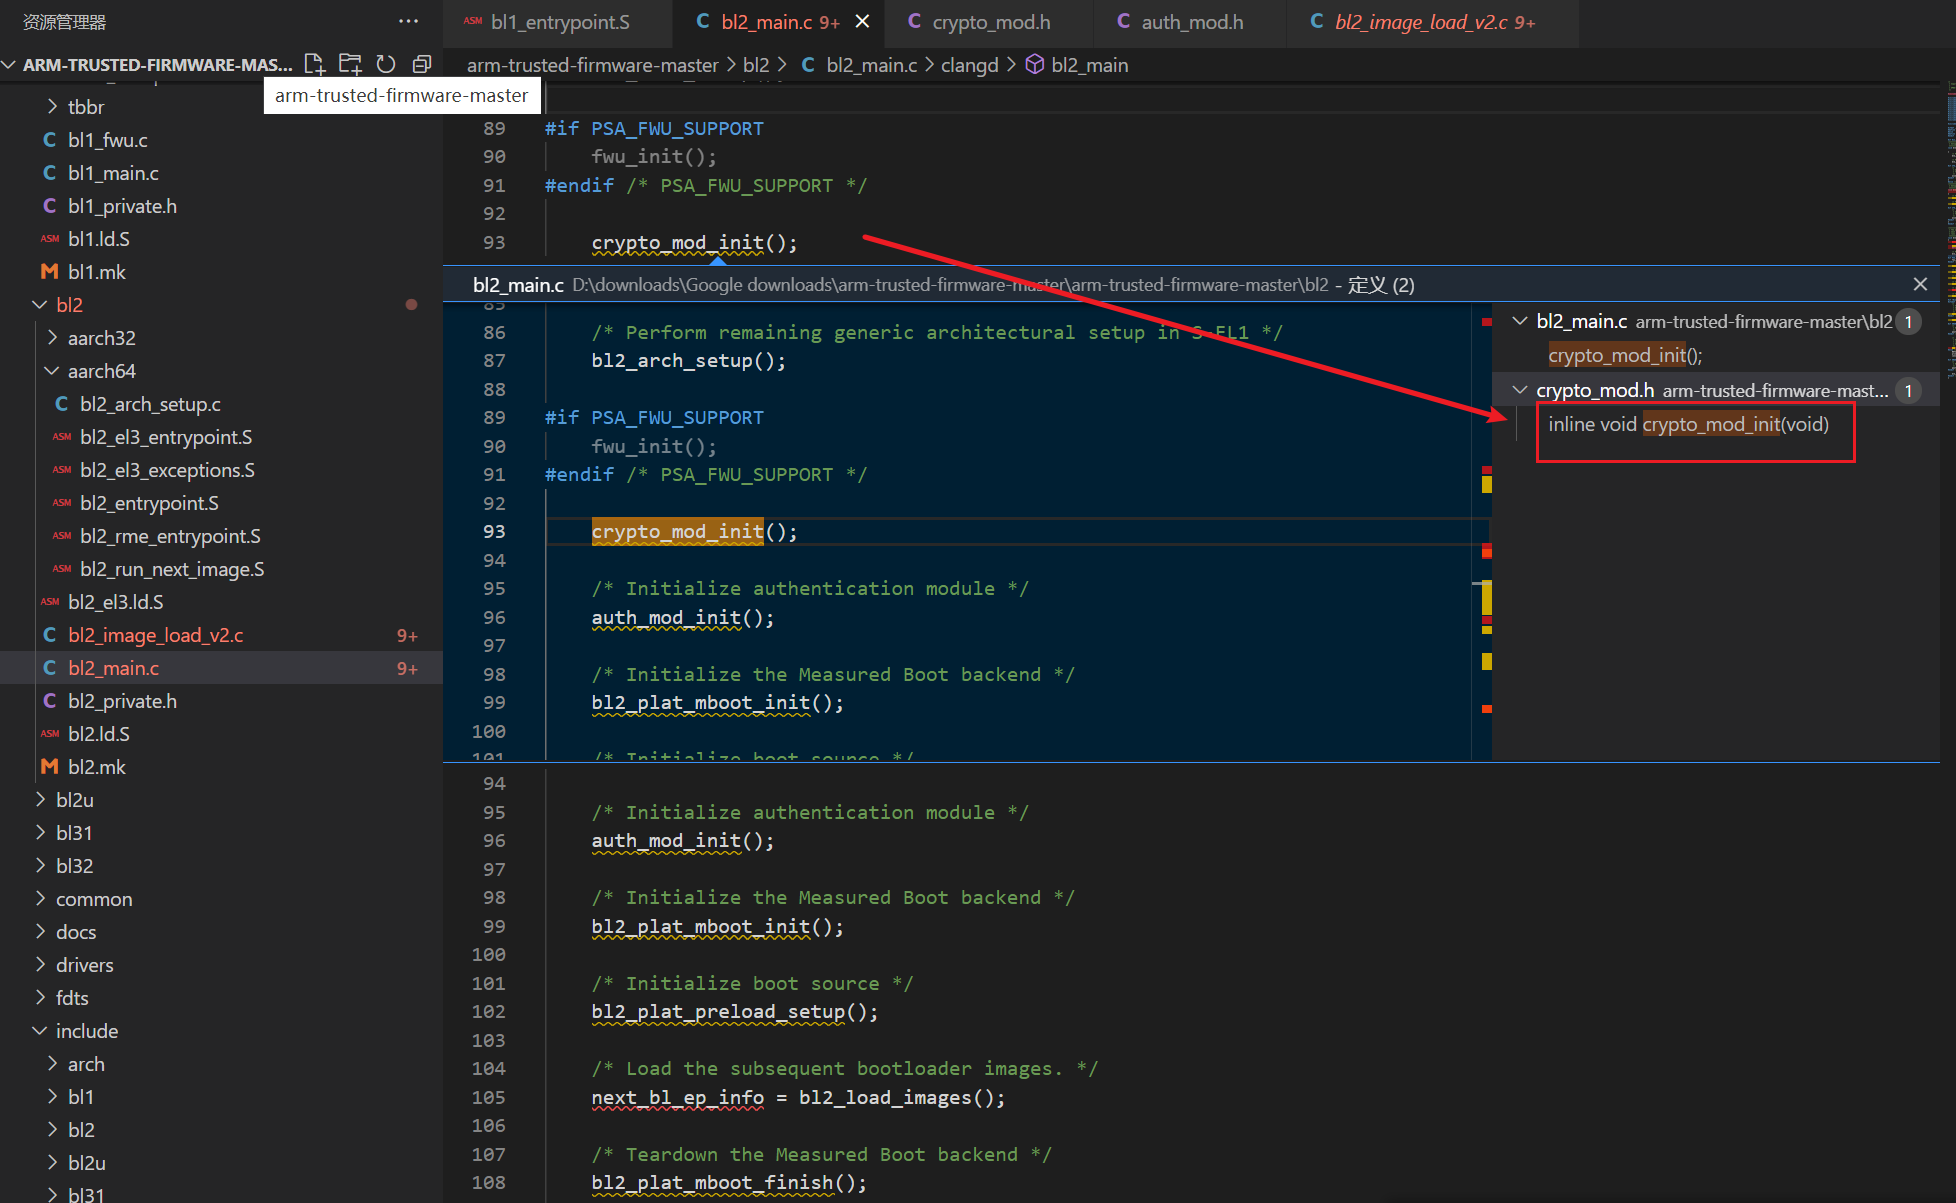
# crypto_mod_init()主要初始化加密库,加密库可以用于校验签名和哈希,跟进 crypto_mod_init()
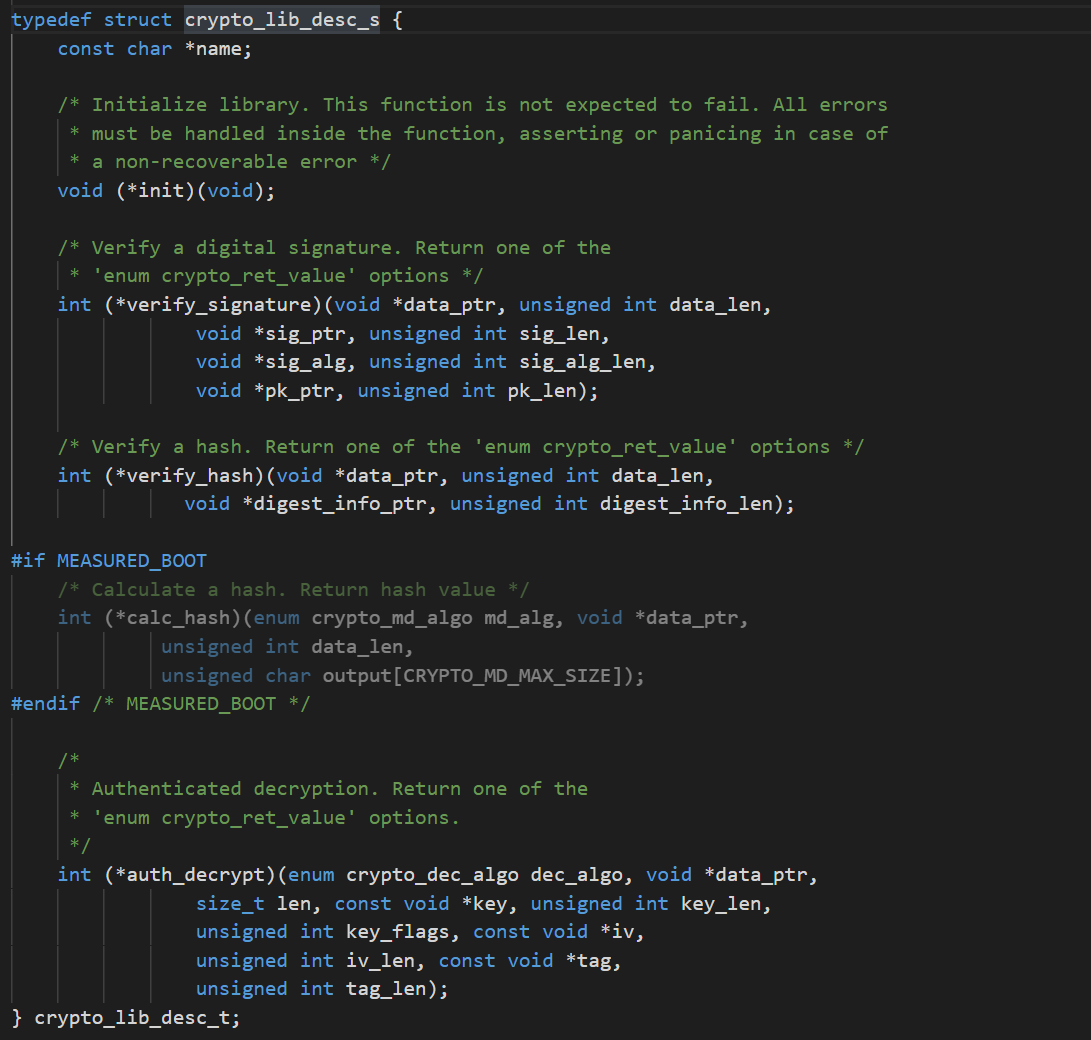
在 crypto_mod.h 中定义了 crypto_lib_desc_s 结构体
1
2
3
4
5
6
7
8
9
10
11
12
13
14
15
16
17
typedef struct crypto_lib_desc_s { const char *name; void (*init)(void ); int (*verify_signature)( void *data_ptr, unsigned int data_len, void *sig_ptr, unsigned int sig_len, void *sig_alg, unsigned int sig_alg_len, void *pk_ptr, unsigned int pk_len); int (*verify_hash)( void *data_ptr, unsigned int data_len, void *digest_info_ptr, unsigned int digest_info_len); } crypto_lib_desc_t ;
通过 REGISTER_CRYPTO_LIB 宏实现一个名为 crypto_lib_desc 类型为 crypto_lib_desc_t 结构体。宏实现如下:
1
2
3
4
5
6
7
#define REGISTER_CRYPTO_LIB(_name, _init, _verify_signature, _verify_hash) \ const crypto_lib_desc_t crypto_lib_desc = { \ .name = _name, \ .init = _init, \ .verify_signature = _verify_signature, \ .verify_hash = _verify_hash \ }
此模块通过操作 crypto_lib_desc 变量,实现模块初始化、校验签名、校验哈希。函数声明如下:
1
2
3
4
5
6
7
8
9
10
11
/* 模块初始化 */ void crypto_mod_init(void); /* 校验签名 */ int crypto_mod_verify_signature(void *data_ptr, unsigned int data_len, void *sig_ptr, unsigned int sig_len, void *sig_alg, unsigned int sig_alg_len, void *pk_ptr, unsigned int pk_len); /* 校验哈希值 */ int crypto_mod_verify_hash(void *data_ptr, unsigned int data_len, void *digest_info_ptr, unsigned int digest_info_len);
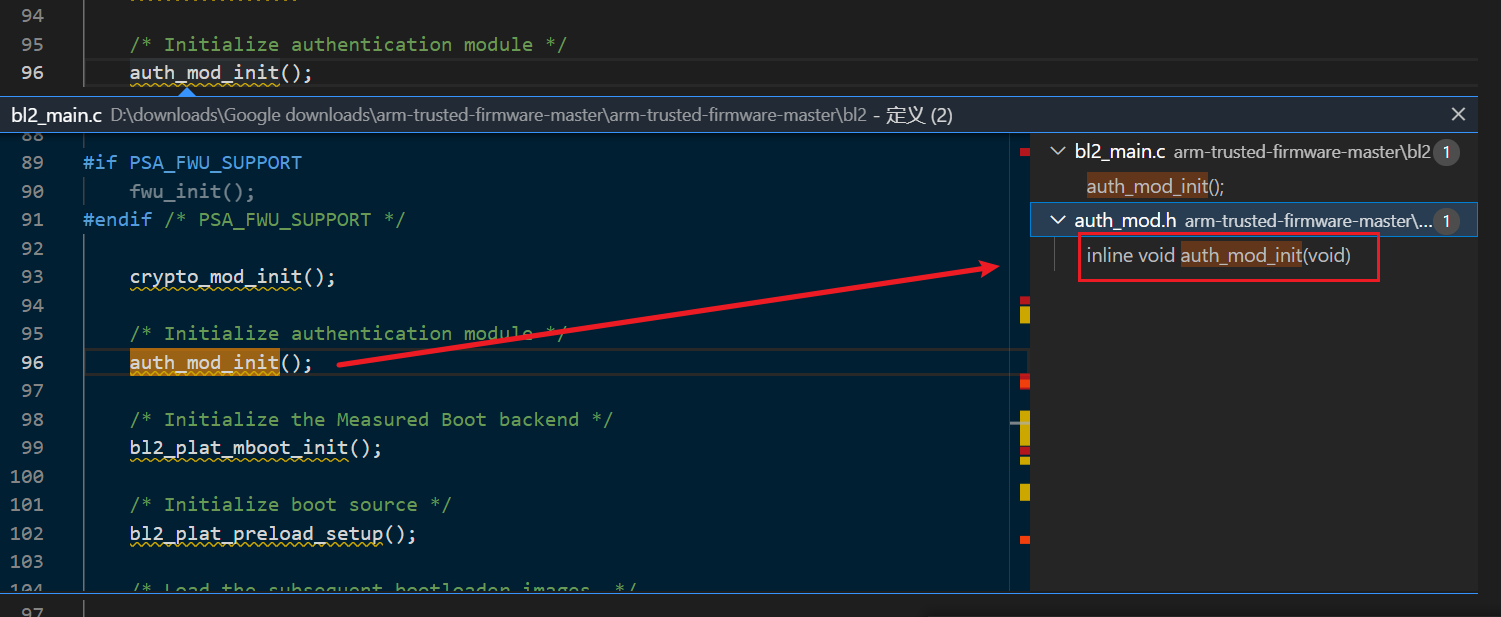
# auth_mod_init()auth_mod 实现了一个校验镜像的模型,此模型通过结构体 auth_img_desc_t 描述,跟进 auth_mod_init,
在 auth.mod.h 中定义了 auth_img_desc_s 结构体
1
2
3
4
5
6
7
8
9
10
11
12
13
14
15
16
typedef struct auth_img_desc_s { /* 镜像的ID,标志是哪一个镜像 */ unsigned int img_id; /* 镜像类型(Binary、证书等) */ img_type_t img_type; /* 父镜像,保存了认证当前镜像的公钥、哈希等 */ const struct auth_img_desc_s *parent; /* 认证当前镜像的方法 */ auth_method_desc_t img_auth_methods[AUTH_METHOD_NUM]; /* 用于校验子镜像的公钥、哈希等 */ auth_param_desc_t authenticated_data[COT_MAX_VERIFIED_PARAMS]; } auth_img_desc_t;
并定义一个宏 REGISTER_COT ,用于注册 auth_img_desc_t 数组
1
2
3
4
#define REGISTER_COT(_cot) \ const auth_img_desc_t *const cot_desc_ptr = \ (const auth_img_desc_t *const)&_cot[0]; \ unsigned int auth_img_flags[sizeof(_cot)/sizeof(_cot[0])]
auth_mod_verify_img 通过 img_id 访问 cot_desc_ptr 数组,找到对应的镜像描述符 auth_method_desc_t ,即可知道当前镜像的认证方式,访问父节点找到签名的公钥或哈希,即可认证当前镜像是否合法。在认证完当前镜像后,从镜像中解析出公钥哈希等放入当前的镜像描述符中,便于对下一级镜像校验
1
2
3
4
5
6
7
8
9
10
11
12
13
14
15
16
17
18
19
20
21
22
23
24
25
26
27
28
29
30
31
32
33
34
35
36
37
38
39
40
41
42
43
44
45
46
47
48
49
50
51
52
53
54
55
56
57
58
59
60
61
62
63
64
65
66
67
68
69
70
71
72
73
int auth_mod_verify_img(unsigned int img_id, void *img_ptr, unsigned int img_len) { const auth_img_desc_t *img_desc = NULL; const auth_method_desc_t *auth_method = NULL; void *param_ptr; unsigned int param_len; int rc, i; /* 根据img_id获取镜像描述符 */ img_desc = &cot_desc_ptr[img_id]; /* 校验镜像完整性 */ rc = img_parser_check_integrity(img_desc->img_type, img_ptr, img_len); return_if_error(rc); /* 根据镜像描述符的仍正方式对镜像进行认证 */ for (i = 0 ; i < AUTH_METHOD_NUM ; i++) { auth_method = &img_desc->img_auth_methods[i]; switch (auth_method->type) { case AUTH_METHOD_NONE:/* 不需要认证 */ rc = 0; break; case AUTH_METHOD_HASH:/* 哈希认证 */ rc = auth_hash(&auth_method->param.hash, img_desc, img_ptr, img_len); break; case AUTH_METHOD_SIG:/* 签名认证 */ rc = auth_signature(&auth_method->param.sig, img_desc, img_ptr, img_len); break; case AUTH_METHOD_NV_CTR:/* Non-Volatile counter认证? */ rc = auth_nvctr(&auth_method->param.nv_ctr, img_desc, img_ptr, img_len); break; default: /* 未知认证类型,报错 */ rc = 1; break; } return_if_error(rc); } /* 从镜像中解析出公钥哈希等,以便对下一级镜像进行认证 */ for (i = 0 ; i < COT_MAX_VERIFIED_PARAMS ; i++) { if (img_desc->authenticated_data[i].type_desc == NULL) { continue; } /* 通过镜像解析器从镜像中提取内容 */ rc = img_parser_get_auth_param(img_desc->img_type, img_desc->authenticated_data[i].type_desc, img_ptr, img_len, ¶m_ptr, ¶m_len); return_if_error(rc); /* 异常检查 防止从镜像中解析出的数据字节数大于镜像描述符中的字节数 出现内存访问溢出 */ if (param_len > img_desc->authenticated_data[i].data.len) { return 1; } /* 把解析出的内容拷贝到镜像描述符中,便于解析下一级BL */ memcpy((void *)img_desc->authenticated_data[i].data.ptr, (void *)param_ptr, param_len); } /* 标记镜像以认证过 */ auth_img_flags[img_desc->img_id] |= IMG_FLAG_AUTHENTICATED; return 0; }
# BL2_image_load_v2.c该函数用来加载 bl3x 的 image 到 RAM 中,返回一个具有 image 入口信息的变量。smc handle 根据该变量跳转到 bl31 进行执行。
1
2
3
4
5
6
7
8
9
10
11
12
13
14
15
16
17
18
19
20
21
22
23
24
25
26
27
28
29
30
31
32
33
34
35
36
37
38
39
40
41
42
43
44
45
46
47
48
49
50
51
52
53
54
55
56
57
58
59
60
61
62
63
64
65
66
67
68
69
70
71
72
73
74
75
76
77
78
79
80
81
82
83
struct entry_point_info_t *bl2_load_images (void ) { bl_params_t *bl2_to_next_bl_params;bl_load_info_t *bl2_load_info;const bl_load_info_node_t *bl2_node_info;int plat_setup_done = 0 ;int err;bl2_load_info = plat_get_bl_image_load_info(); assert(bl2_load_info); assert(bl2_load_info->head); assert(bl2_load_info->h.type == PARAM_BL_LOAD_INFO); assert(bl2_load_info->h.version >= VERSION_2); bl2_node_info = bl2_load_info->head; while (bl2_node_info) {if (bl2_node_info->image_info->h.attr & IMAGE_ATTRIB_PLAT_SETUP) {if (plat_setup_done) {WARN("BL2: Platform setup already done!!\n" ); } else { INFO("BL2: Doing platform setup\n" ); bl2_platform_setup(); plat_setup_done = 1 ; } } if (!(bl2_node_info->image_info->h.attr & IMAGE_ATTRIB_SKIP_LOADING)) {INFO("BL2: Loading image id %d\n" , bl2_node_info->image_id); err = load_auth_image(bl2_node_info->image_id, bl2_node_info->image_info); if (err) {ERROR("BL2: Failed to load image (%i)\n" , err); plat_error_handler(err); } } else { INFO("BL2: Skip loading image id %d\n" , bl2_node_info->image_id); } err = bl2_plat_handle_post_image_load(bl2_node_info->image_id); if (err) {ERROR("BL2: Failure in post image load handling (%i)\n" , err); plat_error_handler(err); } bl2_node_info = bl2_node_info->next_load_info; } bl2_to_next_bl_params = plat_get_next_bl_params(); assert(bl2_to_next_bl_params); assert(bl2_to_next_bl_params->head); assert(bl2_to_next_bl_params->h.type == PARAM_BL_PARAMS); assert(bl2_to_next_bl_params->h.version >= VERSION_2); plat_flush_next_bl_params(); return bl2_to_next_bl_params->head->ep_info;}
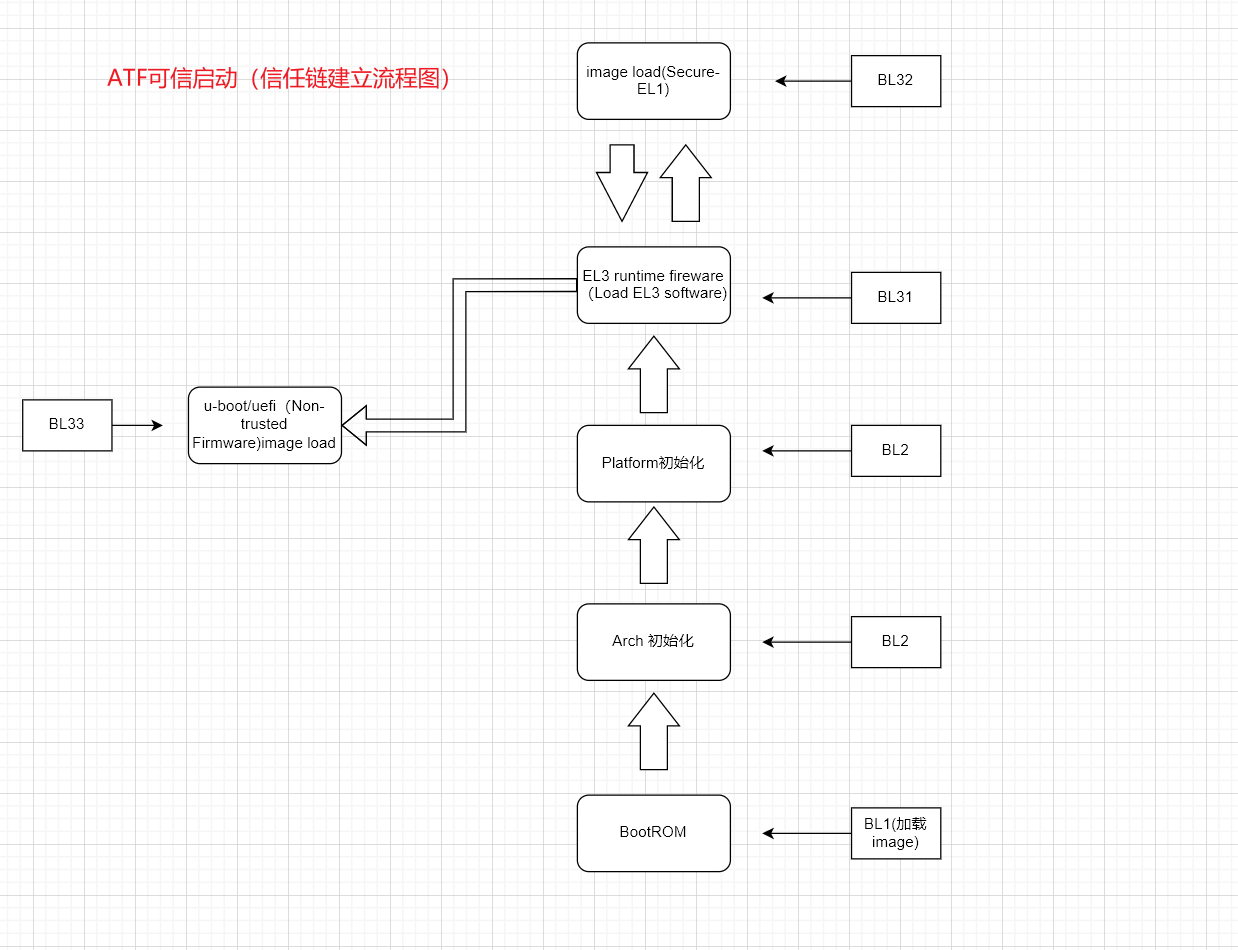
# 四、分析结论 结合 ATF 整个信任链条建立的流程图,我们了解到可信启动中的安全模块和可信机制,从作为信任根的 BL1 开始,逐步进行初始化和加载镜像,最后来到 BL33,后面就是 OS 了。
最后引用一张 ATF 的 UEFI 启动流程进行更直观展示:
以上仅是对 ATF 可信启动机制的简要分析,而对于 ATF 的更深层次技术需要更多信息搜集和整理研究。
# 五、参考文章https://zhuanlan.zhihu.com/p/391101179
https://github.com/hardenedlinux/embedded-iot_profile/blob/master/docs/arm64/arm-trusted-firmware 分析.md
https://blog.csdn.net/puyoupuyou/article/details/109506419?spm=1001.2101.3001.6650.15&utm_medium=distribute.pc_relevant.none-task-blog-2 default BlogCommendFromBaiduRate-15.topblog&depth_1-utm_source=distribute.pc_relevant.none-task-blog-2 defaultBlogCommendFromBaidu Rate-15.topblog&utm_relevant_index=20